Seamless State Management: Redux in Next.js with Hydration

State management lies at the heart of building large-scale React and Next.js applications, ensuring that data flows predictably and efficiently across various components and also between client and server for server-side rendered pages. Redux, a powerful state management library, has become a very popular solution when it comes to managing application state. In this blog post, we'll dive into the world of state management in Next.js applications, while using next-redux-wrapper and the Redux Toolkit.
Navigating State Management Challenges in Next.js Server-Side Rendering
In a Next.js application, server-side rendering (SSR) plays a crucial role in optimizing performance and improving search engine visibility. When we fetch data from APIs on the server using the getServerSideProps function to render our pages, a problem emerges: the data retrieved on the server side is not automatically available on the client side. Also, we need to have consistency in the way we trigger or use the response data of an API, otherwise, we will end up writing separate logic for server and client-side rendering.
Imagine your Next.js app fetching essential data during server-side rendering and rendering the page beautifully. However, as soon as the page loads on the client side, the data disappears. This disconnect between server and client-side data can result in a less-than-optimal user experience and hinder the functionality of your application.
To address this issue, we need a way to bridge the gap between server and client-side data, ensuring that the data fetched during SSR remains accessible and consistent throughout the application's lifecycle. And also ensures that we have a single way of triggering an API and using its response for rendering purposes on both client and server-side rendering.
Enhancing State management with next-redux-wrapper and hydration
The next-redux-wrapper allows us to create a server-side Redux store effortlessly. By using this library, we can write consistent code for both server and client-side data fetching, as both can utilize Redux for state management.
With server-side Redux, the data fetched during SSR becomes part of the client’s Redux store as well. This means that the same Redux store that serves our server-side-rendered page can be utilized on the client side as well. This unified approach simplifies our codebase and reduces redundancy, ensuring that our application functions consistently across the server and client.
Hydrating Client-Side Redux
Now that we have a server-side Redux store, how do we make sure our client-side Redux store is hydrated with the data from the server? This is where the magic of the hydrate action from the next-redux-wrapper comes into play.
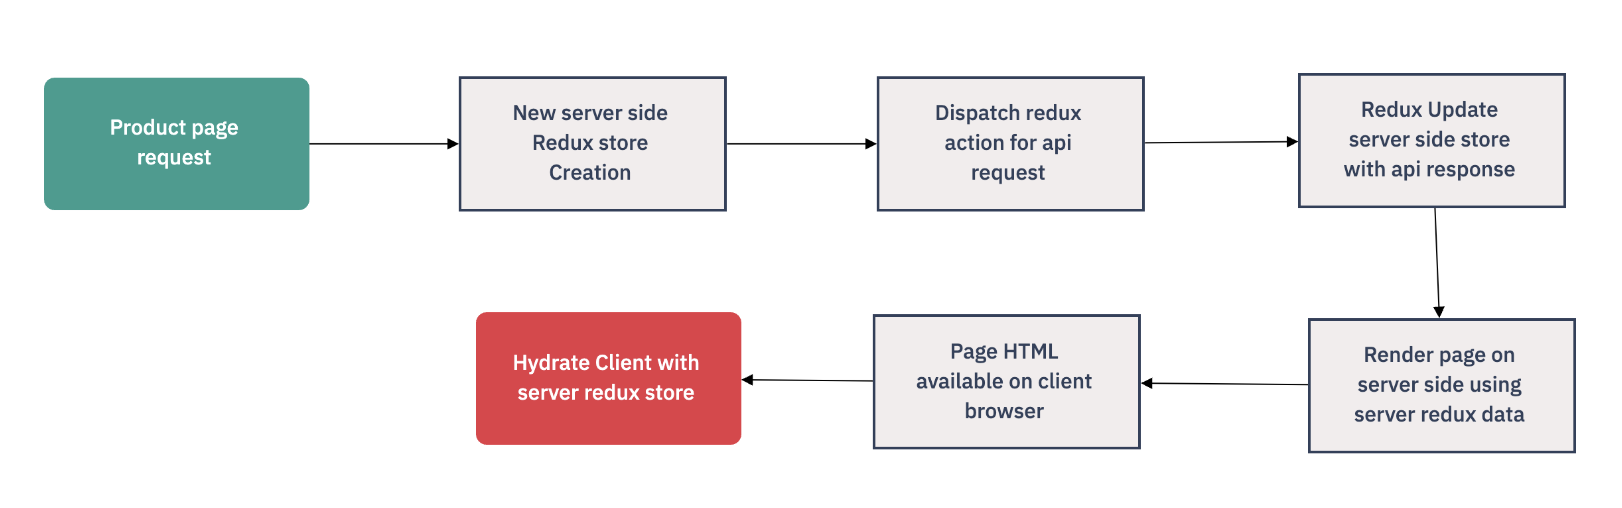
The "hydrate" action allows us to synchronize the client-side Redux store with the data stored on the server. It intelligently combines the initial server-side state with the client-side state, ensuring that our application starts with the correct data on the client side. This whole architecture can be represented as follows:
Implementation
Now that we've explored the challenges of server-side rendering without Redux and the promise of next-redux-wrapper with hydration, it's time to delve into the implementation details. In this section, we'll walk you through the step-by-step process of integrating Redux into your Next.js application using next-redux-wrapper for one of the server-side rendered pages of our website, the product detail page.
Step 1: Install the required Redux dependencies
We will start with installing all the required dependencies as discussed for our project:yarn add @reduxjs/toolkit react-redux next-redux-wrapper
Step 2: Create the slice using the redux toolkit
Redux Toolkit is a powerful tool that simplifies and streamlines the development of Redux-based applications by providing a set of convenient utilities, enabling developers to write clean, efficient, and maintainable Redux code with fewer boilerplate and configuration tasks. In the redux toolkit, a slice is a collection of Redux reducer logic and actions for a single feature in your app, typically defined together in a single file. So let's look into the practical implementation of our slice for product details data:
import { useSelector } from 'react-redux';
import { createAsyncThunk, createSlice } from '@reduxjs/toolkit';
import { GetCatalogDetailsAPI } from 'api/services';
import { IAPI_ACTION, IDispatcherType, IInitialStateWithHydration, INITIAL_STATE_WITH_HYDRATION } from 'types';
import { isEmpty } from 'utils';
import { HYDRATE } from 'next-redux-wrapper';

export const ProductDetailsApi = createAsyncThunk('product-detail/api', GetCatalogDetailsAPI);

// Product Detail Slice

export const ProductDetailSlice = createSlice({
    name: 'productDetail',
    initialState: INITIAL_STATE_WITH_HYDRATION(),
    reducers: {
        RESET: (state) => Object.assign(state, INITIAL_STATE_WITH_HYDRATION()),
        CLEAR_ERROR: (state) => {
            state.error = '';
        },
    },
    extraReducers: {
        [ProductDetailsApi.pending.toString()]: (state: ReturnType<typeof INITIAL_STATE_WITH_HYDRATION>) => {
            state.data = {};
            state.error = '';
            state.loading = true;
            state.isFetched = false;
        },
        [ProductDetailsApi.rejected.toString()]: (state, action: IAPI_ACTION<any>) => {
            state.loading = false;
            state.isFetched = false;
            state.error = '';
            state.data = action.payload;
        },,
        [ProductDetailsApi.fulfilled.toString()]: (state, action: IAPI_ACTION<any>) => {
            state.loading = false;
            state.isFetched = true;
            state.error = '';
            state.data = action.payload;
        },
        [HYDRATE]: (state, action) => {
            const { payload: { productDetail = {} } = {} } = action || {};
            return {
                ...state,
                ...((!isEmpty(productDetail.data) || productDetail.error) && productDetail),
                isHydrated: true,
            };
        },
    },
});

export interface ProductDetailState {
    [ProductDetailSlice.name]: ReturnType<typeof ProductDetailSlice.reducer>;
}

export const productDetailSelector = (state: ProductDetailState): any => {
    return state[ProductDetailSlice.name] || {};
};

const getSelector = (): any => {
    return productDetailSelector;
};

export const useProductData = (): IInitialStateWithHydration => {
    const selector = getSelector();
    return useSelector(selector);
};

export const resetProductDetail =
    () =>
    async (dispatch: IDispatcherType): Promise<void> => {
        await dispatch(ProductDetailSlice.actions.RESET());
        return;
    };

export const triggerProductDetail =
    (payload: any) =>
    async (dispatch: IDispatcherType): Promise<void> => {
        await dispatch(ProductDetailsApi(payload));
        return;
    };
The core components and their functionalities are as follows:
Async Thunk for API Call: The ProductDetailsApi async Thunk is created to handle API calls for fetching product details.
Product Detail Slice Creation: The ProductDetailSlice is a Redux slice generated with createSlice(). It initializes the state, offers reset and clear error reducers, and handles extra reducers for pending, fulfilled, and rejected API actions.
“Hydrate” action: As discussed before, next-redux-wrapper provides a hydrate action which fires when we receive the server-side redux store data. In this action, we can write the logic of when we want our client to use the server-side store data.
Selector for Product Detail State: productDetailSelector is a selector function to access the product detail state, ensuring data consistency and type safety.
Custom Hook for Data Retrieval: The useProductData hook employs useSelector to provide access to the product detail data in a structured manner, along with hydration status.
Dispatch Action Creators: The resetProductDetail and triggerProductDetail action creators manage state changes by dispatching the corresponding Redux actions.
Step 3: Configuring the store
Now we need to create a store for our redux so let's create a file named “store.ts” in our root directory where we can write the configurations for our common server and client-side store.
import { combineReducers, configureStore, Reducer, PayloadAction } from '@reduxjs/toolkit';
import { createWrapper } from 'next-redux-wrapper';
import { useDispatch } from 'react-redux';
import { RESET_REDUX_STATE } from './utils/constants';
import { ConfigSlice } from './slices/ConfigSlice';
import { ProductDetailSlice } from './slices/ProductDetailSlice';

interface ISimpleMap {
    [field: string]: Reducer;
}

const reducerMap: ISimpleMap = {
    [ConfigSlice.name]: ConfigSlice.reducer,
    [ProductDetailSlice.name]: ProductDetailSlice.reducer,
};

const appReducer = combineReducers(reducerMap);

const rootReducer = (state: any, action: PayloadAction) => {
    if (action?.type === RESET_REDUX_STATE) {
        state = {};
    }
    return appReducer(state, action);
};

//NOTE:- Do not export and use this store
const store = configureStore({
    reducer: rootReducer,
    devTools: false,
});

// We should always create new instance of store whenever it is called
export function getStore() {
    return configureStore({
        reducer: rootReducer,
        devTools: false,
    });
}

export const wrapper = createWrapper(getStore, { debug: false });
export type RootState = ReturnType<typeof appReducer>;
export type AppDispatch = typeof store.dispatch;
export const useAppDispatch: () => AppDispatch = useDispatch; // Export a hook that can be reused to resolve types
Combining Reducers and Root Reducer: We start by using Redux Toolkit's combineReducers to consolidate multiple reducers into a single root reducer named appReducer.
RootReducer: This can be used for actions which can have an impact on multiple other reducers like “RESET_REDUX_STATE” which can be used to clear all your local redux data.
Configuring the Redux Store: With configureStore, we established the Redux store. For our purposes, we opt to disable development tools.
Creating a Next.js Wrapper: The next-redux-wrapper creates a Redux store wrapper for Next.js, with fresh store instances via the getStore function.
Custom Hook for Dispatch: The custom useAppDispatch hook, utilizing useDispatch, grants a typed dispatch function which will be used to dispatch actions on the client side.
*Note: Always generate a new store on request and do not export the generated store directly from the store.ts file as this can lead to a common store on your server for all the requests coming from separate users.
Step 4: Wrapping our app with redux
Now we need our redux store to be available for all our components so we need to wrap our app with redux. We achieve this by using the <Provider> component from react-redux. By passing the Redux store obtained via wrapper.useWrappedStore() to the <Provider>, we grant the entire application access to the shared state. This ensures that the Redux state is readily accessible to all components through the store prop, facilitating efficient state management across the app.
const App = ({ Component, ...rest }: AppProps) => {
    const { store, props } = wrapper.useWrappedStore(rest);
    const { pageProps } = props;

    return (
        <>
            <ErrorBoundary>
                <Provider store={store}>
                    <Component {...pageProps} />
                </Provider>
            </ErrorBoundary>
        </>
    );
};
Step 5: Updating Redux store data
Server-side store updation
Now, we've reached the implementation of getServerSideProps for server-side rendering of our product detail page. In this step, we make parallel calls to two APIs to fetch the product details and the common user configuration, both essential for rendering the page. Additionally, these fetched data sets play a crucial role in facilitating user interactions beyond the initial page rendering.
export const getServerSideProps = wrapper.getServerSideProps((store: any) => async (context) => {
    const { params: { moduleType: queryModuleType = '', productId = '' } = {} } = context;
    const moduleType = MODULES[(queryModuleType as string)?.toUpperCase() as keyof typeof MODULES] || '';

    try {
        if (moduleType && productId) {
            await Promise.all([
                store.dispatch(
                    triggerProductDetail({
                        module: moduleType,
                        productId,
                    }),
                ),
                store.dispatch(triggerConfig()),
            ]);
        }
    } catch (error) {
        console.log(`${moduleType}_product_detail_load`, error);
    }

    return {
        props: {
            moduleType: moduleType,
        },
    };
});
wrapper.getServerSideProps: Here wrapper is a function that we created in our store file. Here the outer function (store: any) is responsible for creating and providing the server-side Redux store, This store can now be used for dispatching redux store actions.
We are doing two parallel API calls to fetch data from product details and config API through the trigger function imported from their respective slices. The rest of the job to fill the store will be done automatically by the thunk middleware.
Once the data fetching is successful the function returns to the page component for rendering where it simply fetches data from the product detail slice and uses it to render the page.
As we have both client-side and server-side rendered pages in our application the “redirectedFromServer” prop helps us in determining the same on our common parent component.
Client-side Store updation
In many scenarios, there may also be a need to update the store on the client side. This can be effectively accomplished by utilizing the 'useAppDispatch' hook and the action triggers created within the slice.
const dispatch = useAppDispatch();
useEffect(() => {
        dispatch(resetOrderDetail());
}, []);
Step 6: Accessing Store Data
Now that we have updated our product data in the Redux store, we also need to access it in our components. The following snippet illustrates how to access data from our Redux store using the 'useProductData' function we created in our slice. Additionally, this code seamlessly executes both server-side rendering and client-side updates, just as we intended.
const { data: productData, error, loading, isFetched } = useProductData();
Conclusion
In this post, we worked on the integration of the redux toolkit and next-redux-wrapper with next js. These are powerful and flexible tools that will surely enable you to solve the next.js state management problems for large-scale applications. By seamlessly bridging the gap between server and client-side rendering, these tools empower developers to deliver smooth and responsive user experiences. With a clear understanding of their benefits and implementation, you're well-prepared to elevate your Next.js projects to new heights.
Happy Coding!